Monday, August 8, 2011

Plastic Grocery Bag Origami...

...AKA Things My Mother Learns While Watching Kooky Korean Television.

So even though my mother is Vietnamese, I think her eight years in Korea really did a number on her Southeast Asian psyche because when she wants to relax, she sits down to hours and hours of

- Korean soap operas where the men have the gayest hairdos EVER,

- superdepressing human interest documentary type shows that feature the most down on your luck Korean people you can imagine,

- superwacky variety shows featuring really bizarre acts from all over the world and hosted by a man who can only be described as a cross between that guy who hosts Sabado Gigante and Bobcat Goldthwait if that man were Korean, and

- Korean cooking shows that show you how, among other things like crisping up cabbage with ice water, to fold up your plastic grocery bags like a good little Japanese housewife might.

Seriously. Who comes up with this crap???

And then when I visit her, she shows me all these neat little tricks with a Kris Kringle twinkle in her eye like she just discovered the best thing since sliced bread.

I'll admit it. When my mom first showed me this grocery bag folding trick, I thought to myself: How bored and lonely of a housewife do you have to be to look at your plastic bag stash and come up with ways to bust a Martha on that mess of polyethylene??? 

But as it turns out, this really is a pretty neato, space saving trick for a gal who never throws them away, opting instead to repurpose them as trashbags, temporary fridge storage bags for produce, and Honeydew doo-wrappers (not with the same bag, mind you). Plus it's kinda soothingly zen to fold up your grocery bags, sort of in that weird way that washing dishes can be oddly relaxing.

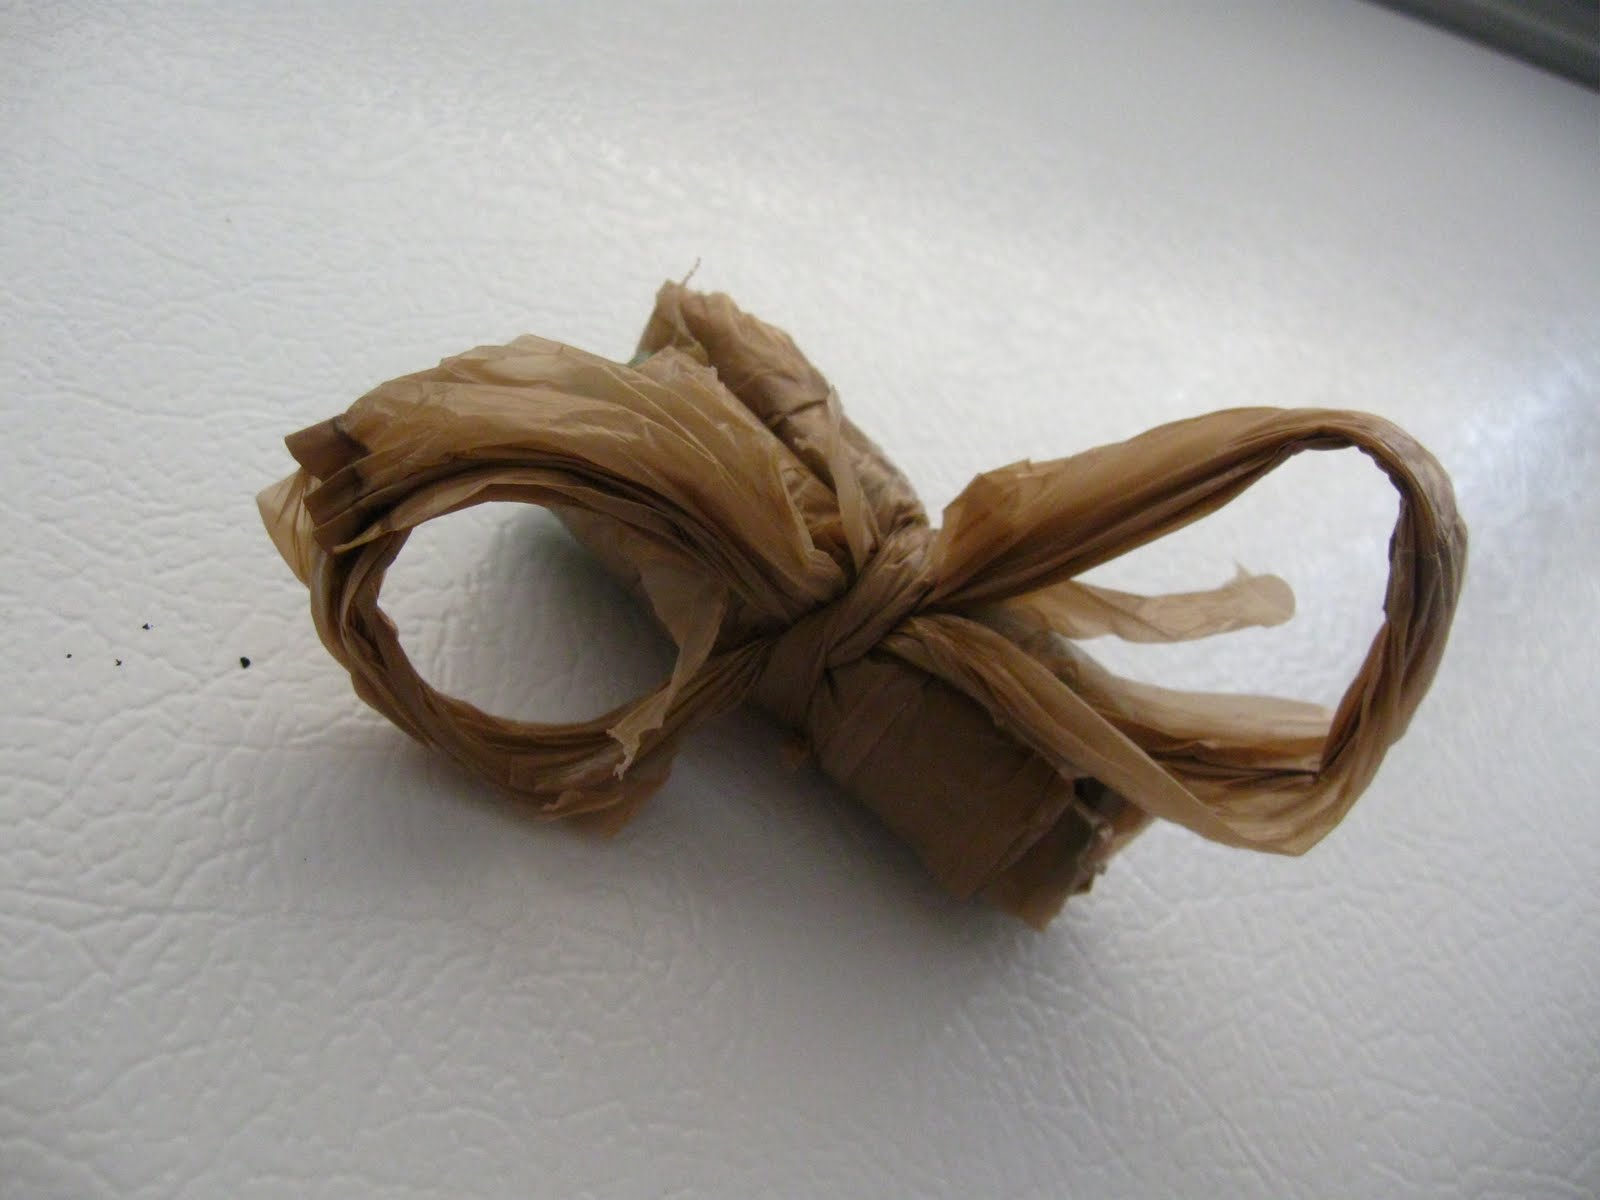
PLASTIC GROCERY BAG ORIGAMI

1) Take your plastic grocery bag and roll/fold/scrunch it lengthwise so it's about 2 to 2.5 inches wide.


2) Roll the bag from the bottom up, leaving just the handles. I find it easy to wrap the bag around two fingers as I roll.


3) Take the bunny ears (bag handles) and twist them once so they don't come undone when you bring them around the front to tie them in a single knot.


4) Bring the handles around to the front widthwise and tie a single knot and !VOILA!


These are so much more compact and easy to store than if you just bunch them up and shove 'em in a drawer.

Now to wash the lunch dishes like the exciting and fascinating housebiatch I am...

shinae

Sunday, August 7, 2011

A Better Pickled Pepper...

I don't remember exactly when I discovered pickled jalapenos, but I'm pretty sure it had something to do with KFC and a bucket of extra crispy dark meat because my mom used to love the extra crispy kind. That was years before I learned to appreciate the crispyfatty goodness that is fried chicken skin, but I still don't care for KFC's breading, which must be equal parts 11 secret herbs and spices, flour, and SALT. That shizz is wayyyyy too salty. But I digress...

Having grown up eating and loving tangy, spicy pickled stuff, I took to pickled jalapenos like white on rice, and I can't remember a time we didn't order pickled jalapenos with our KFC unless we had the misfortune to stumble on a location that didn't sell them.

I could crunch on these all day...

But as much as I loved the things, I had two beefs with them:

1) unlike my beloved kimchi, they were squishy, AND
2) unlike my beloved kimchi, they squirted.

So I took to slicing the jalapenos and quick pickling them and ended up with what I think is a zestier, crunchier and prettier pickled pepper that isn't soggy, doesn't squirt, and can be eaten an hour after making. It's yummy with fried chicken and Mexican food of course, but it's also one of my favorite accompaniments to noodle soups.

If you look real close, you can see the orange in the veins.
These suckers estan muy picantes.

CRUNCHY QUICK PICKLED JALAPENOS
Makes about 25 ounces

- about 1/3 pound of jalapenos, 5 or 6 large ones, sliced on the diagonal in roughly 1/8-inch thick pieces (tips on how to pick them here)
- 1 medium carrot, sliced on the diagonal in roughly 1/8-inch thick pieces
- 1/2 a medium onion, sliced into roughly 1/4-inch thick slices
- 1 or 2 garlic cloves, crushed or sliced into 2 or 3 pieces

- 1+1/3 cup distilled white vinegar
- 1 Tablespoon + 1 teaspoon kosher salt
- 1 Tablespoon + 1 teaspoon sugar

- 2 Tablespoons neutral oil
- 1/2 Tablespoon Mexican oregano
- 1 bay leaf

1) Prep a minimum 24 ounce jar or tight-lidded plastic container by washing with soap, rinsing with hot water, and drying thoroughly.

2) Pack your vegetables into the jar or container, layering the peppers, onions and carrots in alternating layers. Add the garlic wherever you like. Because it's crushed, the flavor will quickly and easily steep into the vinegar.

A repurposed 25 oz. kosher dill jar...

top view :)

3) Make the brine in a medium bowl by mixing the vinegar, salt and sugar and stirring or whisking until all the salt and sugar are dissolved.

4) Pour the brine over the vegetables.


5) Bloom the oregano and bay leaf by heating the oil to medium hot and then stirring in the herbs - just a quick stir or two should do it. The oil should be hot enough that the herbs sizzle when they touch it.


6) Pour the oil with the herbs into the pickle.


If you're using a jar, screw the lid on tight and give it a few gentle shakes to distribute the oil and herbs and get some of the brine on the veg at the top of the jar. If a lidded plastic container, give the vegetables a few gentle packs by pushing down with a spoon. This packing motion should distribute the oil and herbs throughout the brining liquid. In any event, the oil will float back up to the top, but its flavor will be imparted to the brine before.


oil floats :P

7) Keep in the refrigerator. Pickles will be ready to eat in an hour and will keep at least a couple of weeks.


With last night's winner winner chicken dinner... :)

I usually re-use the brine once after all the pickles are eaten by adding a little more salt and as much veg as will fit into the container.

I think you'll like this (not quite) peck of pickled peppers. :)

shinae

Friday, August 5, 2011

STRANGE GRUB: Cosmic Gifts That Look Like Aliens...

For as long as I've been conscious of it, it's seemed to me that the less you expect from life, or really, the less you feel entitled to, the more good stuff comes your way. Certainly it's not always a material change - that is to say that sometimes, the change is really in your perspective - but sometimes it is. I know it sounds all hokey and metaphysical, but my life really does seem to work this way. I don't always get it right, but whenever I'm truly grateful for just enough, the Universe usually sends me something so much better.


Eight - count 'em - EIGHT live uni...


Not to get all Wayne Dyer preachy in your face, but when, after a couple of years of interesting but mostly fruitless dating, I decided that all I really needed was a good man with a kind soul who would laugh and cry at the same things that make me laugh and cry and care for my children as though they were his own, I got that plus a hot, funny, geeky in the best way, fellow musician and foodnik who shares my obsession with really good sushi and voluntarily watches cooking shows every morning before he goes to work. (Well, that or Samantha Brown's Travels or No Reservations...)

When we decided all we needed was just enough space to live, cook and sleep in, where my kids would be comfortable, and where we wouldn't be soaking in triple digit temps for the summer, we got a little bungalow literally a 3 minute bike ride to the beach with a little yard where we can plant things and the Man can brew his beer and drive no more than six minutes to get to work as opposed to the hour it used to take him before we moved.

...some of them as big as The Man's head.


And most recently, when we decided that we would live on a somewhat limited food budget (among other budgets) and forego more regular sushi dinners (among other things) in order to allow me to stay home and try to carve out a new career path, the Universe sent us Diver Dude, who shall remain nameless to protect our source of ridiculously fresh from the dive (but legal!) uni year round and, when in season, spiny lobster, for a fraction of what we would pay retail.

Which might not be a big deal to some, but considering that I am *CUCKOO* for sushi and that uni (which is Japanese for sea urchin) is one of my very favorite kinds, this is a B.ig F.ucking D.eal to me. Nutty, buttery, and sweetly tasting of the sea, I can eat this stuff straight out of the shell with a little bit of that salty sea water to foil the sweet, on top of sushi rice and wrapped with nori (seaweed) and/or shiso, over plain rice with a little spicy ponzu laced with sesame oil, or even atop spaghetti with a little bit of garlic, bonito shavings and a sprinkling of toasted nori strips. Top it off with some really crisp and light lager or cava, and I'm somewhere nearing nirvana.


According to Diver Dude, these suckers are usually found about 50 feet underwater. Pair the diving with the somewhat labor intensive and delicate process of removing what I like to call roe clusters but what are apparently actually gonads, and it's not hard to see why you can easily pay anywhere from 12 to 20 dollars for a mere two pieces of uni sushi.

It would be almost indecent for me to tell you what we paid (or rather, didn't pay) for this much uni...

Sorry the pic's so yellow - nighttime, fluorescent bulb in the
kitchen, that kinda thing...

...with clusters this big...

monster uni

...but I can tell you that I, armed with a hammer and a paring knife, earned every bit of the savings in elbow grease and fine motor skills. 'Tis a delicate operation removing a critter's nutsack fully intact, as you can imagine.


uni carnage
Oh, the humanity...

uni pickin' fangers...

A pile of shells and ten inky digits later, sweet, delicious, delicate uni atop steamed rice and topped with a spicy ponzu with chili and sesame oil...


And just last night, yet another obscene quantity of uni with a ponzu of cucumbers, red onion, jalapeno, ginger, lemon zest and wasabi...


We'll probably slow our roll now that we've gotten our kid in a candy store overindulgence out of the way, but boy does it ever pay to be grateful some days...

shinae

Monday, August 1, 2011

GUEST BLOGGER MONDAY - A Man & His Bacon...

Just a quick note for those of you following my personal Kimchi Chronicles, I've added some post mortem notes to the last batch (scroll to the end of the post) that you might find of interest. And now, with no further ado, I present to you my first guest blogger: 


DA MAN.
__________


Hello, ridiculous hungry readers. 


My name is Dean, or you may have heard of me as 'The Man' (though not in the popular culture or religious senses of the word).
Like many corn fed white guys who grew up in a middle class, middle-American household, I love most forms of 'sanitized' land-lubber meat. I grew up preferring leaner cuts cooked until they more resembled hockey pucks than the animals that were slaughtered for our enjoyment.
homecured bacon...


However, in my adulthood I've been introduced to many other cuisines and have expanded my palate greatly. I now prefer fattier cuts and MUCH less done preparations. One meat that I have loved all the way through my life, through the thick and the thin so-to-speak, is bacon. Delicious...fatty...heart stopping...artery clogging...sometimes smoky...BACON!!!!
Bacon goes with many things, hence the "Bacon makes everything better" phrase. Or was that butter? Perhaps both!! Being a home brewing and chili pepper/culinary herb growing type of DIY'er, how else could I further my unnatural love of bacon? By curing my own of course!! Let us enter the wonderful, yet mystic, world of bacon curing.
Ingredients
Pork Belly -- Be sure to pick a cut with a nice thick slab of meat between the fat layers
Kosher Salt -- Not as strong as table salt or as coarse as sea salt
Brown Sugar -- Just trust me on this one
Process
You should have a pan or dish of some kind that can keep the pork belly separated from the liquid that will leach from it. Otherwise, you will need to empty whatever dish you do use daily and dab the top of the pork belly with paper towels. With that out of the way, let's begin.
Each day rub a nice thick layer of salt on the skin (this side requires more salt to cure than the meat side) and a light layer of salt on ALL sides of the meat. After that rub in some brown sugar to the meat sides.
You can cure the pork belly in a dark cool place (if you prefer a more prosciutto-like musty flavor) or in the refrigerator. I did mine in the refrigerator. You will cure the meat for roughly five days, each day sprinkling salt on all sides of the meat but without rubbing. At this point you have two choices:
1) Rub some more brown sugar, slice into strips, and cook with your breakfast, burgers, scallops, or whatever else you like to have your bacon with.
2) Smoke the meat in a smoker. For this I recommend using apple wood chips and smoking with a really low temperature (200 degrees Farenheit) for around 90 minutes per pound--this should ideally yield an internal temperature of 150 degrees. This ensures that you get the meat nice and smoky without cooking it too far. Once done, slice and cook it up!
homefried bacon...
(with a little extra brown sugar sprinkled on top!)


I must say that this bacon was the best bacon I've ever had. Maybe it's because I made it and got all happy with my DIY-ness. Maybe it's because it was just plain tasty. I even ate it like a chip with a piece of raw uni (sea urchin) on top. That is quite a weird combo to most, but given the uni was live less than 60 seconds before I ate it and came from a local diver...I LOVED IT!!
beautiful bacon...

bacon, rice and kimchi - 
One of Shinae's favorite childhood meals.


I hope you all enjoy, I know I did. :P
The Man

Sunday, July 31, 2011

Spicy Chicken Boolgohgi Kebabs For Beer Making Folk...

The Man used to work for a certain well known once-rogue craft brewery, and he still loves to brew beer at home regularly. So yesterday was a brew day for him, and now we've got two big jugs of Belgian Pale Ale bubbling and fermenting in our living room (it was a veritable Fermentation Fest up in here this weekend).

impromptu brewers' dinner

Because brewing a crapton of beer is an all-day and usually outdoor affair, it can easily turn into a little bit of a shindig. And when you've got friends coming over to help you lift big, heavy, lobsterpot-like mash tuns and boil kettles, you certainly can't let them go hungry.

But it's also one of those somewhat regular and casual things that isn't quite like a party for which you plan menus and such. So you dig deep into the fridge and pantry to see what odds and ends you can feed a few hungry guys who are drinkin' beer while makin' beer and their significant others who come bearing potlucky type things later in the afternoon. And you try to space them far enough apart so no one thinks about how the food you're serving them doesn't match because you assume everyone gives as big a crap about the food you're serving as you do.

Let's see... There were corn tortillas and blended pico de gallo fixins, so fresh chips (fried in oil with a little dab of bacon grease) and salsa were put out.


And when the chips ran out there were figs, a small chunk of the Man's homecured brown sugar bacon from last week, a little baby chunk of Parmiggiano and some honey, hence Figs Two Ways:


And then for dinner, since you bought a tray of chicken thighs earlier in the day during your weekly grocery run so they're the only unfrozen protein in the fridge other than the catfish you also bought (the pork bones were placed in the freezer), you make spicy dahk (chicken) boolgohgi aka boolgogi aka bulgogi kebabs because no one doesn't love the flavor of boolgohgi and because kebabs seem to magically make more food out of less meat.

That, some perennially crowd-pleasing crunchy soy slaw augmented with some fish kebabs fashioned from the cod and veg provided by one (pescavegetarian) guest, some pork chops provided by another, a 12-pack of Sierra Nevada Pale Ale and some other beer odds and ends and !Voila!

Impromptu Brewers' Dinner.

Dahk (chicken) boolgohgi (BOOHLgohgee) is usually made spicy whereas the beef kind isn't. But the base of the marinade is quite similar. I like to use thigh meat because the texture, flavor and fat content holds up better to the marinade than breast meat. This recipe is specifically for kebabs, but you could certainly use whole pieces of boneless thigh meat or even the entire thigh if you like, and cooking times will differ.

Generally speaking, I'm not a big advocate of overnight marinating. There are very few proteins that won't cure (essentially turn into ham is the way I like to think of it) under the saltiness of most marinades if left to sit in them overnight. The marinating point of diminishing returns is even earlier on meat that's cut kebab-size (1" to 1.5" cubes). Ideally, I would let this marinate for 45 minutes to an hour, and no more than two hours.

SPICY KOREAN CHICKEN BOOLGOHGI KEBABS
Makes about 12 kebabs
Serves 4-ish

- 12 to 15 bamboo skewers soaked in water for at least an hour before they go on the grill

- 2 to 2.5 pounds boneless, skinless chicken thighs cut into roughly 1.5-inch *cubes* (to the extent that you can cut chicken thigh meat into cubes, which is to say not really)

If you can't find the boneless, skinless meat, just get a roughly 3.5 pound tray of chicken thighs, remove the skin and trim the meat off as close to the bone as possible. I did, and made my weekly chicken stock from the scraps (only I left a little extra meat around the bone to feed Honeydew).

- 2 Tablespoons minced garlic (about 3 cloves)
- 1 teaspoon minced fresh ginger root (or you could use about 1/4 teaspoon dry ginger powder)
- 1 green onion, finely chopped
- 1/8 cup sugar
- 1/8 cup gochoojahng (Korean red chili paste) aka gochujang (you can substitute with sriracha - not quite the same, but you'll get a tasty result)
- 1/8 cup low sodium soy sauce
- 1 teaspoon kosher salt
- 1.5 Tablespoons neutral oil (like vegetable, canola, grapeseed)

- 1 large onion, cut into 1" pieces for skewering and tossed with 2 teaspoonfuls of oil

1) In a large mixing bowl, mix together all the ingredients except the onion, making sure to incorporate all of them thoroughly.


2) Cover the bowl and set in the fridge to marinate (about 1 hour ideally, and not more than 2). Remember to take the meat out of the fridge about 30 minutes before you're ready to grill.

If you're using a charcoal grill, start your coals about 20 to 25 minutes before you want to grill. You want a gentle, medium low heat over which to cook these kebabs.

If gas, just pre-heat your grill to medium low 5 to 7 minutes before cooking.

3) Skewer your kebabs so they look like this:


6 single layers of onion with 5 roughly 1" layers of chicken skewered between them. As you've probably discovered by now, it's a little challenging to get 1" cubes of meat from chicken thighs, but you generally want a 1" thickness of meat between veg, so you might have to add odd pieces of chicken to the bigger ones to achieve this thickness.

I used only onions primarily because I think it tastes simple and delicious this way. I don't think other traditional kebab vegetables go as well with this recipe. Plus there was soy slaw on the side, which complemented the kebabs quite nicely.

Everyone seems to *LOVE* this slaw.

4) Over a medium low grill, cook the kebabs  about 15 minutes, covered, turning them every 5 minutes.


They should look like this close up:


A little spicy, slightly sweet yet savory and super tasty with some plain steamed rice (I still can't seem to keep most white folk from dousing their steamed rice with soy sauce. :/) and a bite of that slaw.

This marinade, by the way, also works for dwaeji boolgohgi, which is spicy Korean style pork BBQ, and is especially delicious when made with thinly sliced pork belly. I often leave the ginger out when I make that, though.

A spicy/salty/sweet combo that's always a huge hit, and too easy not to try, really. :)

shinae

P.S. Here's the chicken stock:

Before china cap but after I removed the
meaty bones for Honeydew...

after china cap :)

Tuesday, July 26, 2011

Canh Bun Ca - Vietnamese Rice Noodle Soup With Fish...

"Mama, If you made the snail soup with tomatoes but put fish in it instead, what would you call it?" <send>

<open> "It would be: Canh Bun Ca. Canh: Soup; Bun: Vermicelli; Ca: Fish."

"Is that your literal translation or is that what the dish is normally called?" <send>

<open>"I heard people make this kind of soup. It is not my translation. Usually, we put some kind of vegetables called "rau rut" in it. I saw that vegetable only once in a Vietnamese market. How is Honeydew?"

"Honeydew is a wreck from being left alone at home for a few hours over the weekend so now she's following me everywhere I go. Other than that, she's good. :)" <send>

<end emails>

Canh Bun Ca. (KKANG boohn KKAH).


That's the recipe I'm sharing with you today. Rice noodles in a deliciously layered tomato broth with pieces of white fish poached in that broth (though shrimp would be just as delicious) and accompanied by assorted greens and herbs to be eaten with spoonfuls of noodle and soup for flavor and crunch. Wedges of lime and sambal oelek on the side for added zip and spice (but sriracha would also be tasty).

Truly a hair of the dog antidote for the still and somewhat oppressive heat that visited us yesterday.

By now, you might already know that mine are not the recipes to consult if you want to tell your foodie friends that you made an authentic this or that. We eat all kinds of stuff in our house on a reasonable but limited budget, and I am highly unlikely to keep a stash of rau rut in the produce drawer, or even the lemongrass and tamarind often used to make the bun oc (a similar dish with sea snails as the protein) that is the inspiration for this recipe. Shoot, I didn't even have pork stock on hand last night and used chicken instead.

When I make my knockoff versions of traditional dishes, I aim to approximate flavors and textures as best I can by using ingredients that can easily function in multiple cuisines. The closer I can get to original, the happier I am as a cook. But if I can deliciously satisfy the craving for a dish by hitting all the different notes within a fairly small ballpark, I can be pretty darned happy as an eater.

This dish, while slightly richer, is certainly and strongly reminiscent of bun oc, but it could very well satisfy a craving for bouillabaisse (BWEEyaBAESS) or cioppino (chohpPEEnoh) if you're willing to put a Vietnamese spin on it. ;)

CANH BUN CA (KKANG boohn KKAH)
Serves 4

- roughly 11 oz. of bun tuoi (Vietnamese rice vermicelli) cooked per package instructions, 4 servings of al dente angel hair will work in a pinch, but nothing thicker

- 1.5 to 2 pounds of white fish cut into 1" chunks, or medium shrimp, peeled and deveined, lightly seasoned with salt and pepper

- 1 medium yellow or white onion, peeled and cut into sixths (or smaller if you like)
- 5 cloves garlic, smashed and peeled
- 1 inch segment of fresh ginger root, sliced into 1/8" thick pieces
- 1 Tablespoon neutral oil (vegetable or canola is fine)
- 1 Tablespoon tomato paste
- 1/2 Tablespoon red chili flakes
- 2 pounds tomatoes (beefsteak or plum), peeled and quartered OR one 28 oz. can of whole tomatoes, drained and cut into quarters
- 8 cups unsalted pork or chicken stock (or some combination of stock and water, but try to do at least half stock)
- 3 Tablespoons fish sauce
- salt if needed to adjust seasoning

- a plate of thinly sliced fresh herbs and vegetables to eat with bites of noodle and soup (sorta like the herbs and sprouts that come with pho): lettuce, fresh sprouts and spearmint are typical. Last night, I used red lettuce, green cabbage, green onion, cilantro, spearmint and fresh jalapeno)
- 2 limes, cut into 12 wedges

1) In a large pot, bring 1 Tablespoon of oil to medium high heat and saute the onions, ginger and garlic until the onions just begin to turn translucent, about 3 to 4 minutes.

2) Turn the heat down to medium and stir in the tomato paste and red chili flakes and saute for another minute or so. The resulting caramelized tomato paste gives the soup its color as well as some of the tang you would get from using tamarind.


3) Add in the chicken stock, tomatoes (I used fresh) and fish sauce and bring the soup to a boil.


4) Once the soup comes to a boil, turn down the heat to medium low and simmer, partially covered (leave about 1/2" crack to allow steam to escape) for 20 to 25 minutes. While the soup is simmering, you can boil the noodles, prep the fresh veg, and put the noodles in noodle bowls, about 1.5 cups cooked noodles per serving.

5) After 25 minutes, put the fish or shrimp in the soup and adjust the seasoning, adding a pinch or two more salt if needed. Stir in the fish and simmer until the fish (or shrimp) *just* turns opaque. As soon as it turns opaque, no more than 3 or 4 minutes usually, turn off the heat.


6)  Ladle enough soup into the bowls to to cover the noodles and then some. You want a healthy ratio of broth so the noodles don't absorb too much.


7) Serve with the fresh veg and mint garnish and lime and sambal on the side.


I like to add a squeeze or two of lime and a dollop of sambal to my soup. I also like to add some lime juice and sambal to the mix of greens. It adds brightness and zing to each bite. 


Great hot weather food when you want to sweat off the heat, great cold weather food when you want to warm your belly.

Hope you like.

shinae